When pasting files or folders in a new location, Windows 11 helps you know if duplicate copies are already in the folder by asking if you want to replace or skip files. However, users have complained of a problem where Windows 11 is not asking to replace or skip files even when duplicates exist.
When this happens, the pasted file is copied to the new location with a slight name modification. So, for instance, a duplicate johndoe.png, may be pasted as john-doe.png. If you fall under this category, the solutions below should fix it.
Why is Windows 11 Not Asking to Replace or Skip Files?
Most of the time, this problem is triggered by the configuration settings of the File Explorer. The Hide Folder Merge Conflicts option is often associated with the problem.
You may also have wrongly misconfigured registry settings that spark the error. But also, if you use third-party copy utilities, there may be a corruption or compatibility problem.
Regardless of the cause, you should find success using the solutions in this guide.
How Do I Fix the Problem of Windows 11 Not Asking Me to Replace or Skip Files?
1. Restore File Explorer Default Settings
File Explorer has been part of the Windows OS since Windows 95. It provides users with a Graphical user Interface for accessing the operating system’s file system. Windows 11 may not be asking to replace or skip files due to the wrong configuration of the File Explorer. So, you may restore it with the steps below.
Step 1: Press Windows + E to open File Explorer.
Step 2: Click the See more ellipses and select Options.
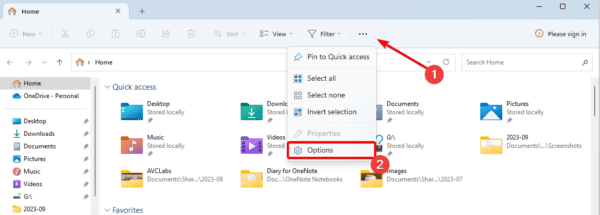
Step 3: Click the View tab and the Restore Default button.
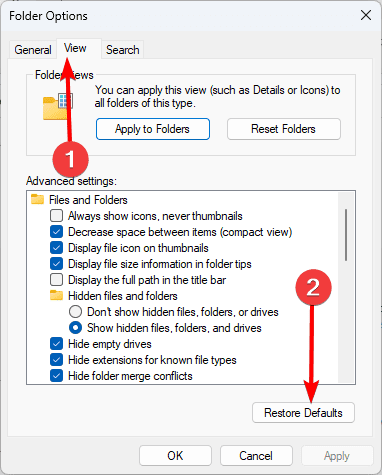
Step 4: Click Apply and OK.
2. Reset Windows 11 File Explorer
In the solution above, you restored File Explorer settings to their defaults. While this is often effective, you may require a more elaborate fix on rare occasions. In such cases, you should reset the file management utility using the below steps.
Step 1: Launch the File Explorer app by pressing Windows + E on your keyboard.
Step 2: Click the See more ellipses and select Options.

Step 3: The Windows should be opened to the General tab by default. Here, click the Restore Default button.
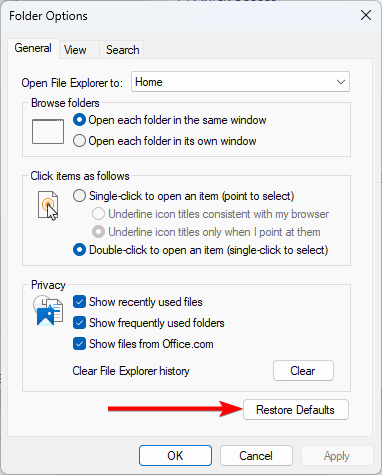
Step 4: Click Apply and OK.
3. Disable Hide Folder Merge Conflicts
Hide folder merge conflicts is a File Explorer setting on Windows 11 computers that stops the OS from displaying warnings during file transfers. With this option enabled, you tell the computer to override the existing information without confirmation. Here is how to disable it.
Step 1: Press Windows + E to open File Explorer.
Step 2: Click the See more ellipses and select Options.

Step 3: Click the View tab and the Restore Default button.
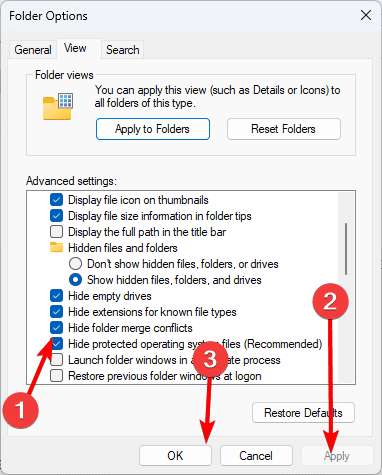
Step 4: Untick Hide folder merge conflicts, then click Apply and OK.
4. Tweak Related File Explorer Registry Values
On Windows 11, the Registry holds a set of configurations and settings for the operating system. These values may be edited using the Registry Editor to change specific behavior on your computer. When Windows 11 is not asking to replace or skip duplicate files, and resetting File Explorer does not, you may edit the ConfirmFileReplace registry value.
Step 1: Launch your Run dialog using the keyboard hotkeys Windows + R.
Step 2: Type regedit and hit Enter.

Step 3: Navigate to the path below.
HKEY_CURRENT_USER\Software\Microsoft\Windows\CurrentVersion\Explorer\Advanced
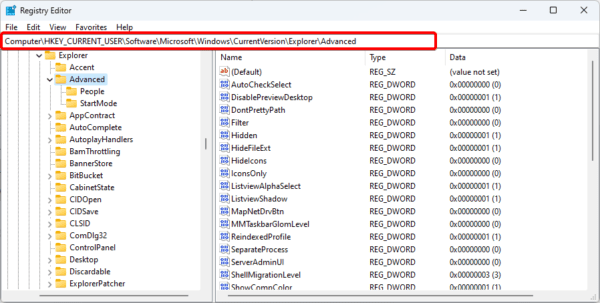
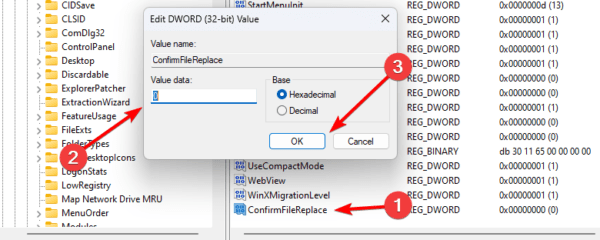
Step 4: Look for the ConfirmFileReplace key on the right pane. Double-click it and change the Value data to 1, then click OK. If you do not have this key, continue to Step 5.
Step 5: Click on any space on the right pane, select New, and click DWORD (32-bit) Value.
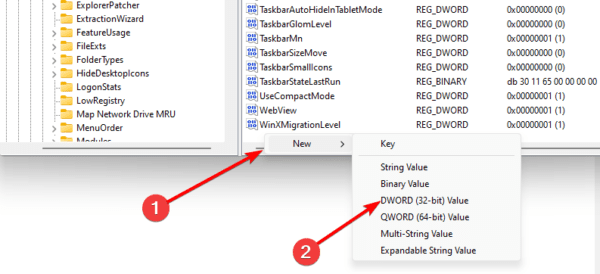
Step 6: Name the newly created key ConfirmFileReplace. Double-click it and set the value to 1, then click OK.

Copy Files without Hitch
This is all we will be discussing. If you have followed the solutions in this guide, you should now see a notification when copying duplicate files to a folder. If you know other solutions to this problem, we love to hear them in the comment section below.

